Friday, November 16, 2012

WEBER 45 DCOE CARBURETOR INSTALLED

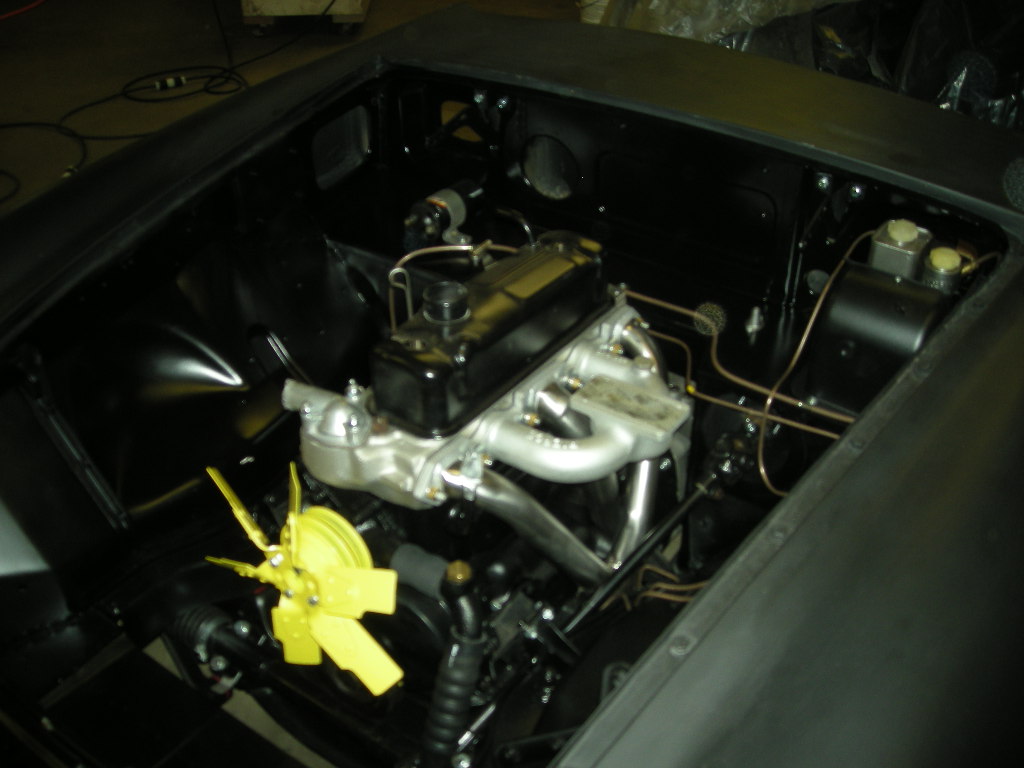
Fitting this Weber carburetor was a bit difficult because all I had was the carburetor and manifold.  It was necessary to fabricate all the linkage.  
I bought the accelerator cable from a local bicycle shop.  It's the same material, only less expensive.


You will notice the fuel filter installation in the photo above.  It is a generic filter from Napa Auto Parts, cheap and effective.  I also plan to install one between the fuel tank and the fuel pump.
It appears that it will be necessary to purchase another air filter assembly.  The filter I had in stock was a bit large and did not have the proper clearance between it and the wheel house.  Here we go again...buying parts.


The archive listing of this blog contains detailed step-by-step photos and narratives regarding this restoration since it began late last December.  Please direct any comments and questions to tommystoplesscars@yahoo.com.

Later...
Tom McCurry 

Materials and equipment purchased from:
Moss Motors (mossmotors.com)
Victoria British (victoriabritish.com)
Eastwood (eastwood.com)
The Roadster Factory (the-roadster-factory.com)
English Parts (englishparts.com)
Napa Auto Parts (napaonline.com)
Apple Hydraulics (applehydraulics.com)
Coker Tire (cokertire.com)


Thursday, November 15, 2012

THE HEAT SHIELD IS COMPLETED

After a long sabbatical, I have resumed work on my MGB.  I had been doing a frame-off rotisserie restoration on a 1961 Austin Healey 3000 BT7 timsnewtoy.blogspot.com and my shop was devoted to it.  
Now, the Healey has been completed and it actually won the "People's Choice Award" in the Hilton Head Island Concours d'Elegance. I'm back!
Today I fabricated and fitted the exhaust manifold heat shield to the manifold.  The shield is fastened to the manifold with stainless steel "U" bolts and deflects the heat away from the brake lines which are visible in the foreground.

Tomorrow I will permanently install the side-draft Weber carburetor.  It will also be necessary to fabricate the accelerator linkage and cable.  
My painter, John, has made a few necessary repairs to the hood and urethane primer has been applied.  Tomorrow, it will be blocked and the final finish will be applied to the underside.
Hopefully, my MG will be on the road by early spring.  I cannot wait to drive it!

Stay tuned...
Tom McCurry

Wednesday, May 30, 2012

FABRICATION OF A HEAT SHIELD

Realizing that the brake lines are installed in the same position as they were originally, they are in close proximity to the exhaust manifold.  Much to close for me.  So, I am fabricating a heat shield from sheet aluminum to prevent the brake fluid from over heating.  
I have two options.  One, is to fabricate a shield mounted to the frame shielding the brake lines; the other is a shield attached to the header accomplishing the same.  Attaching the shield to the frame is a bit more complicated.  Attaching it to the header is less attractive.  So, I plan to fabricate both styles and choose the one that will be the most effective and the least obtrusive. 

Ya'll come back now...
Tom McCurry

Tuesday, May 29, 2012

REBUILT WEBER 45 DCOE

I admit,  the thoughts of rebuilding a Weber 45 DCOE was a bit intimidating.  After reading several internet articles about this subject, I was a bit more confident.  
The rebuild kit cost less than $30 and consisted mostly of new gaskets and "O" rings.  Including cleaning the carburetor, the rebuilding process was completed in less than two hours.  
After rebuilding the carburetor, I mounted it on the manifold so the fuel lines, throttle linkage and choke cable could be fitted properly.


Looks great doesn't it...
Tom McCurry


Wednesday, May 23, 2012

FITTING THE INTAKE MANIFOLD

After bead blasting the aluminum intake manifold, I applied a very thin coat of high temp silver paint.  The paint will prevent the raw aluminum from oxidizing.  

The flange thicknesses of the intake manifold and exhaust manifold vary by 3/16 of an inch.  To compensate for the difference, I attached a shim to the thinner flange.  Now the washer and nut apply the proper pressure to each flange preventing leaks.  Why can't these manufacturers engineer these parts to fit.  It isn't "rocket surgery".  But,  it is what it is.
Now, I am in the process of rebuilding the side-draft Weber carburetor.  As I explained in a previous post, the carburetor was clogged with dirt and varnish.  Cleaning is the first step in the rebuilding process.  This may take some time.

Stay tuned,
Tom McCurry

Sunday, May 20, 2012

THE WEBER DCOE45 INTAKE MANIFOLD

At one point in time I was considering the purchase of a supercharger from Moss Motors.  Priced at $4000, it exceeds my current budget.  So, I have decided to install a side-draft Weber carburetor.  The carburetor is used and needs to be rebuilt but rebuild kits are not at all expensive.  
The photo to the right shows the intake manifold for the Weber.  Since it is made of aluminum, I can bead blast it and it will look new.  
I plan to dismantle the carburetor tomorrow and let it soak overnight.  I took a peek inside and it is "full" of dirt and "varnish".  


Love this car...
Tom McCurry

Friday, May 18, 2012

MORE ABOUT WIRING

After locating the fuse block near the firewall,  it was fastened in place.  The wires were then separated and moved to their respective locations.


Next, I went to work on the headlights. I began by fitting the new rubber gaskets behind the headlight buckets and fastening them to the opening in the fender.  


 After the buckets are fastened in place the inner rim is mounted to the bucket.  I replaced the adjusters, wiring and springs on both headlights just to eliminate any future problems.
Finally the headlights are positioned, just to make sure they fit properly.  The finish paint has not been applied yet so the headlight assemblies must be removed.
These headlights are really cool.  The signal lights are actually inside the headlight itself.  If you look closely, you can see the small amber bulb just below the center of the bulb.


The car will also have driving lights.  They will be located in the grille area.

Stay tuned,

Tom McCurry


Thursday, May 17, 2012

THE WIRING BEGINS

We are almost ready to drive the "Killer B".  In order for the car to be "road worthy" (not necessarily street legal), we must complete the wiring,  attach the intake and side draft Webber carburetor and install the radiator.
The wiring is a bit complicated, at least it is for me.  In the photo to the right, you will see the wiring harness I purchased from ez2wire.com.  It is a relatively simple harness with everything labeled.  The labels are actually printed on the wires.  This should be easy 2 wire...wish I hadn't said that.


Y'all come back now...hear?
Tom McCurry

Monday, May 14, 2012

FUEL LINES ARE CONNECTED

There are always issues associated with assembling an MG using parts from different year models.  For instance, the fuel delivery system for a '67 MGB is entirely different from that of a '72 model.  It will work but it can be annoying choosing the correct parts from a catalog.  The system I have installed is custom fabricated and is very basic in design.

The photo to the right shows the new fuel line mounted in place.  It is routed through grommets in the frame underneath the right side of the car.  From there it is secured to the deck behind the engine and ends on the left side of the engine compartment near the intake manifold.  It will be connected to the carburetors with a rubber fuel hose.

Stay tuned,
Tom McCurry

Thursday, April 19, 2012

NEW WHEELS AND TIRES ON THE CAR

It has been a while since my last post.  I have had so much trouble with these wheels.  The man I bought them from did not have the lugnuts.  I thought it would be easy to find some that would fit.  It wasn't.  I have spent countless hours online trying to find something that would work.  Finally I found a set that fit the wheel but they weren't long enough.  So today I fabricated an extension for them and finally got the wheels mounted on the car.  What do you think? 


I will have a set machined especially for these wheels when I locate a machine shop with a CNC machine.  It will be expensive, but it worth it.  
Tim is coming down on Monday to check out his Healey and the wiring harness for the "B".

Talk with you again soon,
Tom McCurry


Tuesday, March 20, 2012

NEW WHEELS AND TIRES

A new set of wheels and tires make any car look better.  Feast your eyes on these babies.  I chose  Yokohama AVS ES 100 ultra high performance tires. After some research, I found the 195/60R15 was the perfect size for my "B".  I will post pictures of them on the car tomorrow.


See you then,
Tom McCurry


Sunday, March 18, 2012

STRIPPED DOWN DASH

The gauges looked pretty good at a glance, but after a closer inspection, I found them to be unusable.  After the gauges were unfastened and discarded, I began to remove the vinyl upholstery material and foam backing.  Both ends of the dash were rusted out, from years of sitting outside without a cover.  

I am considering repairing the dash with metal patch panels welded in place.  It is a bit time consuming, but I have checked eBay and there are none up for auction.  I was planning to redesign the dash with fiberglass, so I guess a little welding is not that much of an issue.  Challenging.

Later,
Tom McCurry

Saturday, March 17, 2012

FUEL TANK MOUNTED IN PLACE

This afternoon, I installed the fuel tank we restored yesterday.  It fit perfectly in the pre-drilled mounting holes in the new trunk floor pan.  That is one of the benefits of using OEM parts made in the UK.  


Pictured to the left is the old dash out of the "B".  What a mess.  The vinyl cover is brittle and cracked and the metal structure is rusted around both ends. 
I plan to remove the vinyl and foam covering and repair the rusted areas with new metal.  I may at that point, use the metal structure as a base for a custom fiberglass instrument panel...still in the design stage.


Stay tuned,
Tom McCurry

Thursday, March 15, 2012

REPAINTING THE FUEL TANK

It has been on the shelf for months.  While I was applying epoxy primer to Tim's car, Don sanded and cleaned the old fuel tank.  I sprayed it with primer at the end of the day.  Hopefully, I will have time to install it tomorrow evening.  


This morning, I filled both master cylinders with brake fluid.  The "trickle-down effect" will help fill the brake lines and wheel cylinders and allow some of the air to move to the master cylinders overnight.  It may shorten the time required to bleed the hydraulic systems.  I'll let you know if it helped.

I love my MgB,
Tom McCurry


Wednesday, March 14, 2012

PREPARED TO BLEED THE HYDRAULIC SYSTEM

I devoted two hours this evening to checking suspension, universal joint and hydraulic line connections.  The brake and clutch pedals have been installed, the clutch slave cylinder has been connected and the system is ready to be "bled".  "Bleeding" is a term that refers to the removal of air from a hydraulic system.  There are several techniques to accomplish this.  
I simply pour brake fluid in the master cylinder reservoir.  Using the brake pedal, I pump it to an open bleeder valve at the wheel cylinder that is located furthermost from the master cylinder.  A vinyl hose is connected to the bleeder valve and empties into an open container of brake fluid.  Maintaining a sufficient level of fluid in the master cylinder as the pedal is pumped insures the removal of air from the system.  When the brake fluid discharging through the vinyl hose is free of air bubbles, close the bleeder valve while the brake pedal is depressed.  Now, relocate the vinyl hose and cup to the next closest wheel cylinder and repeat the process.  When all the wheel cylinders have been bled, the system should be free of air.  If, after a short period of time, the brake pedal goes all the way to the floor when depressed, there is still air in the system.  Do it again.
Repeat the process for the clutch system.  With only one outlet at the slave cylinder, the process should require only a few minutes.
If you have a better way...post a comment.  I'm always learning.

Tom McCurry

Tuesday, March 13, 2012

REAR BRAKE LINES AND HAND BRAKE CABLES INSTALLED

Actually, this phase of the restoration was not that difficult.  Sure, some of the brake lines were a bit stubborn to form, but aside from that...


The hand brake cables fit perfectly.  I also connected the drive shaft while I was under the car.  Tomorrow evening, after I complete the painting on Tim's car, I will connect the clutch slave cylinder.  Then I will re-tighten all the fasteners underneath the car.  
Next comes the wiring.

Stay tuned...
Tom McCurry

Tuesday, March 6, 2012

HANGING THE DOORS

This evening, my friend Robert and I mounted the doors.  The door latch assemblies are being restored and will probably be ready for installation in the next couple of days.  With the doors mounted, the latch assemblies can be properly aligned and their location marked so that the final installation can be accomplished without damaging the new paint.  

Just thought you might want to see how the "Killer B" looks with the doors on.  Pretty bad...

It's coming together...
Tom McCurry

Friday, March 2, 2012

INTAKE AND EXHAUST MANIFOLDS ARE INSTALLED

After hours today, I installed the intake and exhaust manifolds.  The exhaust manifold clearance at the frame is ample however, there is an issue with the brake lines.  They are a bit too close to the exhaust manifold.  A heat shield will be installed between the manifold and brake lines.  


The weight of the engine lowered the car another inch.  Just what I wanted.  This is going to look great.

Check us out again soon,
Tom McCurry

Thursday, March 1, 2012

INSTALLING THE ENGINE AND GEARBOX

This evening, we installed the engine and gearbox.  There were a few problems with the new engine mounts.  They seemed to be a bit thicker that the original...Taiwan strikes again.  


All the problems aside, the engine and gearbox are now in place.  Tomorrow, the intake and exhaust manifolds will be installed.  


It's beginning to look like a sports car again.

Later,
Tom McCurry

Wednesday, February 29, 2012

THE MARRIAGE OF THE ENGINE AND GEARBOX

I spent a couple of hours a day this week assembling the engine and gearbox.  The clutch was fitted to the flywheel and torqued to the proper setting.  The clutch must also be aligned with the engine using a special tool that resembles the  splined end of the first motion shaft of the gearbox.   


Some of the peripheral engine parts such as the starter and clutch slave cylinder were installed. They are particularly difficult to access after the engine is installed.  Such items as the intake and exhaust manifolds will be attached after the engine is in place.


The engine and gearbox is now ready to install in the car...Maybe this weekend.

Stay tuned,
Tom McCurry