Monday, November 28, 2011

REWORKING THE DOORS

This car is going to be different. No top, no side windows, no outside door handles or locks and, as we discussed previously, no body side moldings or body lines.


The relief in the door panel for the lock and door handle were cut out and new metal was installed with panel bond. Panel bond is a high tech adhesive suitable for these applications.


Since I have decided to eleminate the side windows, it was necessary to cover the window opening in the top of the door. This metal cover will also serve as the top trim for the upholstered door panel.


Before the application of any body filler, the allignment of the door should be checked and fixed in proper position.


Choose a good quality body filler. This product has changed drastically since the early days of 'bondo'. The good stuff costs considerably more but it bonds to the metal better and resists cracking. I will come up with a brand name for you if you need it.


Later,


TD


Saturday, November 26, 2011

CLEANING AND PAINTING UNDERNEATH THE CAR

This is a time consuming process, but one that will add value to your restoration. In this case it was necessary to refinish underneath because we had replaced all the floor pans. You know... one thing leads to another.


After the front and rear suspensions are removed, these cars weigh only a few hundred pounds and can be lifted easily by an engine hoist.


With the body shell tilted on its side the underneath can be cleaned and prepared for paint more easily. The joints between the frame rails and the new floor pans were finished with seam sealer.


This car had been undercoated years ago so I chose to apply more undercoating rather than cleaning and preparing for paint.


The entire process should take only about 24 man hours.


Now the body work begins...

TD


Thursday, November 24, 2011

INSTALLATION OF WHEEL BEARINGS, ROTORS AND CALIPERS

To begin, all parts must be clean. I strongly suggest using new wheel bearings but if you are considering reusing the old ones, inspect both the bearings and the races that are pressed into the hub for wear. Let the wheel bearings soak in mineral spirits for thirty minutes and blow out with compressed air. Repeat this process with clean mineral spirits until no more debris is found. Now you may pack the bearings with a good quality bearing grease by placing an amount of grease the size of a golf ball in the palm of your hand and press the edge of the bearing into the grease and forcing it out the other side. Grease all bearing races and inside the hub.

Now, fasten the dust covers to the swivel axle. Attach the rotor to the hub and torque the bolts as specified. Attach the hub and rotor assembly to spindle and secure with the nut and cotter pin. Tap the grease cap into place to complete the hub assemble installation.

The caliper can now be attached to the swivel axle assembly and torqued as specified.

The coil springs may be installed safely after the front suspension is mounted to the frame. This will be done after the car is painted and buffed.


Tuesday, November 22, 2011

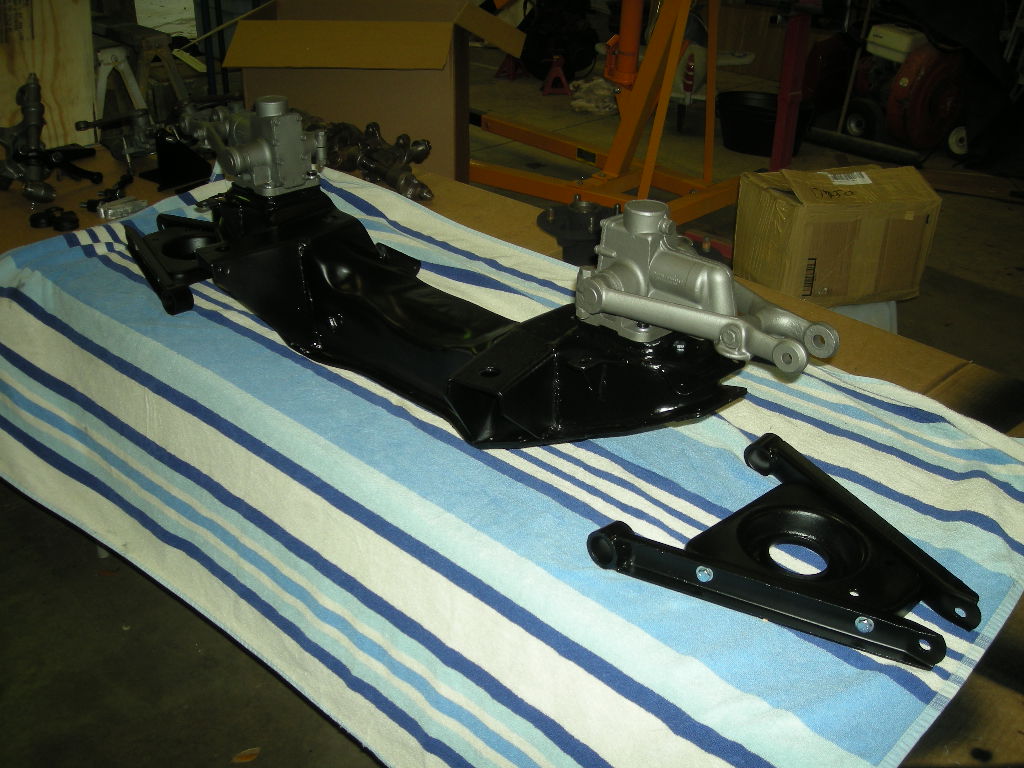
RE-ASSEMBLY OF THE FRONT SUSPENSION

To begin, be sure to consult your manual for the proper fastener torque settings. Next, turn the suspension frame upside down and attach the lower fulcrum pins to the bottom of the suspension frame. Install the new polyurethane bushings and A-arms on the ends of the fulcrum pins and fix castle nuts with cotter pins as required. Locate the coil spring pan between the A-arms but do not tighten. Remember to use new lock washers and nyloc nuts. Now, install the sway-bar link in the larger hole in the front of the A-arm assembly.


Now, following the installation of the new lower kingpin bushings and seals, attach the swivel axle assemblies to the A-arms and torque all the fasteners. Next, install the steering arms to the swivel axle assemblies (note: steering arms are different; radius between mounting bolt holes should point upward). Torque bolts properly. Turn the suspension frame right-side-up and attach the shock absorbers to the mounting plates and torque properly. The coil springs cannot be attached until the front suspension is installed on the car, so install the new polyurethane bushings in the top of the kingpin and slide the shock absorber/kingpin bolt in place. Do not tighten this bolt, it will need to be removed when the coil springs are installed.


Next post will address the installation of the wheel bearings, brake rotors and calipers.


Later,


TD


Sunday, November 20, 2011

SANDBLASTING AND PAINTING THE SUSPENSION PARTS


I decided, since there were so many parts on this car that would require refinishing, to purchase a sandblasting cabinet. I chose a cabinet about 36 x 24 x 24 complete with a light and a dust recovery system. Refinishing the parts just got easier. After sandblasting all the small parts, spray them with self-etching primer to protect them from rust.


Next, clean or sandblast the suspension frame as required. The frame is considerably larger than my sandblasting cabinet so I cleaned mine using a pneumatic die grinder and a fiber paint remover wheel. It only took about an hour. After the paint, grease and rust were removed, self-etching primer was applied.


After the primer has dried properly, the parts should be lightly sanded and primed with an epoxy primer. Allow this primer to dry overnight and lightly sand again. Clean all the parts to remove dust and grease and apply two coats of single stage, semi-gloss polyurethane paint and allow to dry for at least 24 hours before reassembling the suspension


In my next post, I will discuss the re-assembly of the suspension.

Friday, November 18, 2011

RESTORING THE FRONT SUSPENSION

While Paxton was welding the new floor pans in place, I was busy restoring the front suspension. Fortunately, I had another old suspension in stock so that I didn't need to remove the one on the car.


I began by dismantling the suspension. It is amazing what years of neglect will do to an automobile. Some of the parts were fused together with rust and required a tremendous amount of work just to seperate the pieces.


When all the pieces are seperated, the restoration process began. I determined that the shock absorbers and the swivel axle assemblies will require rebuilding.


The shock absorbers had been leaking fluid for some time and the swivel axle assemblies were frozen so I chose to send them to Apple Hydraulics for proper restoration. They can be reached at 800-882-7753...ask for Lazar. Their prices are very reasonable and you can have remanufactured parts in your hands within three business days if your schedule requires.


Now it is time to make a list of the parts required to reassemble the suspension. All the bushings, bolts, nuts and lock washers should be replaced without question. I order my parts from Moss Motors at 800-667-7872 and I always ask for Jason Laffey at extension 3126. He is extremely knowledgeable and helpful. The assembly bolts required can be bought from your local hardware store and are much less expensive than buying them through Moss. I used fine thread, grade 5 bolts, lock washers and nyloc nuts just to be on the safe side. I was able to reuse the brake caliper mounting bolts, the steering arm bolts and the shock absorber bolts, but I did use new lock washers. Do not trust the old ones.


My next post will be concerned with sandblasting and painting the suspension parts.


Later,


TD

Sunday, October 30, 2011

FLOOR PAN INSTALLATION COMPLETED


It has been some time since my last post but the installation of the floor pans is now complete. My friend Paxton has done an amazing job. His welds are near perfect. I pity the guy that finds it necessary to remove these pans. These welds are intended to be permanent.


After the welds are cleaned with a wire brush wheel, seam sealer is applied to the area between the new pan and the frame of the car. With the sealer in place, spray a light coat of primer over the welded and sealed area to highlight any imperfections that may require additional work. Grind the welds and touch-up the seam sealer as required.


After the adjacent areas are sanded and cleaned a heavy coat of epoxy primer should be applied.


The trunk pan, since it will be exposed will require more work than the interior floor pans that will be covered by carpet.


My next post will address preparation of the interior floor pans to receive the seats.

Sunday, October 16, 2011

WELDING NEW TRUNK PAN IN PLACE


After the old, rusty trunk pan is removed and the perimeter has been cleaned and is free from rust and grease. Now, drill or punch 5/16" holes about every 3" around the perimeter of the pan as shown. Now, you are ready to position the trunk pan.


Because it may be necessary to weld underneath the car, so it should be lifted at least 12 inches and placed securely on jack stands. Be sure the car is level from front to back and side to side. The new trunk pan requires the removal of the trunk latch bracket. The bracket is factory installed with four spot welds and is easily removed by drilling a 5/16" hole directly in the center of the weld. After the bracket is removed, the pan can be moved into place from underneath.


After the pan is in place and level in both directions the welding process can begin. Weld one or two of the perimeter holes on each side of the pan and check to make sure that the pan is still level. If the pan is not tight against the frame where it is to be welded, tap it gently with a hammer and weld that area immediately. Repeat the process until all the holes have been welded. Finally, reinstall the trunk latch bracket. The welding process is complete.


The next post will address preparing the new pan for primer and paint.


TD

Tuesday, October 11, 2011

PREPARING TO INSTALL THE NEW FLOOR PANS


It's been a while since my last post. I've been waiting on my friend Paxton to do the welding for me. Since I don't own a wire welder, it's cheaper to have someone do it for you...cheaper, not necessarily quicker.


I began by removing all the rust from the bonding surfaces and sealing the areas to be completely and permanently covered with POR. POR is a product that encapsulates rusty metal and virtually eleminates the need for further repairs. It is a bit pricey but worth every penney. But, be aware that you cannot use POR on surfaces to be joined by welding. Those surfaces will be coated with POR after the welding is completed because welded surfaces tend to rust quicker than usual.


My next post will deal with welding the floor pans in place.


Later

TD

Friday, September 23, 2011

BEGINNING THE BODY WORK


If you remember, I told you that both doors and the deck lid had been stolen before I purchased the car. I was fortunate enough to have a friend with a stockpile of MGB parts and among them was a rear deck lid and two doors. The only problem was, the car had been destroyed by fire. The deck lid was warped from the heat and the interior door trim had melted into every crevasse. I began by stripping the doors down to the metal...after all it was something that needed to be done anyway. It was a time consuming process but worth the effort. As you can see by the photo, they actually turned out pretty well. A little plastic filler and some epoxy primer and they are as good as new.


The deck lid, however, was a different story. The heat had warped it so badly, that it could not be saved. I decided to remove the warped 'skin' from the frame, refinish both sides of the frame and install a new 'skin'. I know it sounds complicated but it isn't. I purchased the 'skin' from The Roadster Factory. It was the only one to be found and it seemed to fit very well. I'll take you through it next time.


TD


Thursday, September 22, 2011

REMOVING FLOOR PANS


FIRST, always wear safety glasses or preferrably a face shield, a dust mask and some good gloves. Now to begin...


The trunk floor pan and the cockpit floors were perforated with rust and required replacement. With the car on jack-stands, I began by removing the fuel tank, fuel pump and fuel lines all the way to the engine compartment. DO NOT GRIND AROUND FUEL...ONE SPARK AND YOU ARE TOAST !


Next, I cut through the rusted metal floor pans with a side grinder taking care not to cut any of the support beams beneath and around the outer edges. Next, remove the welded areas by drilling a hole at each spotweld and using a pneumatic chisel or hammer and chisel, seperate the floor from the frame. These floors were so rusty that portions of the supports were also compromised. It will be necessary to repair these supports prior to welding the new floor pans in place. The frame should be cleaned with a grinder or wire brush to remove all rust. You cannot weld rusty metal.


Before removing the trunk floor pan, take a good look at the new one. Notice how it is made and where and to what extent you should cut the existing floor. There is virtually no support under this section of floor. It is only supported around the edges. As with the cockpit floors, clean the edges to be welded with a grinder or wire brush to remove all rust.


Now you are ready to weld in the new floor pans.


Later,


TD

Wednesday, September 21, 2011

RUSTY FLOOR PANS

Well, back to the current project. This car definitely has some problems, but, on the other hand, it has had some pretty cool work done on it. All the fenders have had the chrome trim removed and the offset body line rounded to create a smooth fender. Also the fenders had been flared to permit the use of wider tires. A new rear valence was added eliminating the bumper completely. I will purchase a new front valence from Victoria British to match the style of the rear.


Unfortunately, after all the body work had been done, the car was parked outside for an extended period of time without a cover resulting in extensive rust in the new cockpit floors and trunk floor. To make matters worse, thieves removed the trunk lid and both doors.


Next post...removing the floor pans and trunk pan.


TD


Tuesday, September 20, 2011

BEFORE PHOTOS OF THE '67 B


What a greasy, rusty mess. Everywhere I looked there was hours and hours of work to do. But one thing at a time...do it to the best of your ability and before you know it, the project is done.


AFTER PHOTOS OF THE '67 B


It took a lot of time but the finished product was worth it. All the hours spent priming and blocking the body really paid off. The detail work done on the interior made all the difference. The metal dash and all the gauges were removed and restored to original condition. And there is nothing like leather upholstry...


Hope you enjoy the pictures.


TD

Monday, September 19, 2011

MY LATEST PROJECT


I know, it's another MGB. So what! They're simple, easy to work on and great fun to drive. But this is not going to be "just another MGB". This is going to be a "killer B". I plan to rebuild the engine with 30 over high compression pistons, a nasty little cam and a SUPERCHARGER...yeah baby! Hope to approach twice the horsepower of the stock engine. I guess we'll see about that. Hope the money holds out. The supercharger, carb and manifold costs about $4,000 from Moss Motors, and their engineering department will help you match up the cam and pistons. I can't wait to surprise that Boxter that keeps blowing my Mini Cooper off the road.

Add Image

Sunday, September 18, 2011

MY 1967 MGB COMPLETED


My MGB was finally completed this past March and I had a blast doing it. I enjoyed it so much that I have already begun my next project...will tell you about it on my next post.


I remembered techniques that I thought were forgotten, learned new techniques that I hope to pass on to you, and tried new products that I promise never to use again. Without the help of Moss Motors, this project would have been much more difficult. They even have a department dedicated to technical issues...check it out.


More to follow...


TD

Sunday, September 4, 2011

I OWE YOU AN APOLOGY

To all my readers...


I wish to apologize to you all. I just got 'caught-up' in the day-to-day work on the car and didn't bother to document my progress in this blog. I suppose I was just having too much fun. The good news is, I did complete the car and I will post some of the photos and a brief explanation of the process. Also, I will post some photos of the finished product. I have since purchased another MGB and I hope to do a better job of documenting the daily progress. Thank you for your loyalty and patience.

TD

Saturday, January 23, 2010

DOWN TO THE NITTY GRITTY


Cleaning the motor and transmission was a messy chore. I tried several different degreasing products, but ordinary oven cleaner seemed to work as well as any of them. The transmission had never been painted so I left it mill finish. I removed the distributor, generator, oil filter and adaptor, intake and exhaust manifolds, and oil pan. After all the cleaning was complete, I wiped down all the engine surfaces, that were to be painted, several times with lacquer thinner, applied masking tape to the parts that could not be removed and applied two coats of high temp engine paint. The engine paint was available through Moss Motors and one can did the job. I cleaned all the nuts bolts and washers with lacquer thinner and a power rotary wire brush. I also bought new lock washers...a good investment. Cleaning and polishing the fasteners gives the engine the "showroom" look. Attention to minor details such as this is the key to a distinctive restoration.


I decided to replace the clutch, pressure plate and through-out bearing. It appeared to have a great deal of "life" left, but I would be upset if I had to replace the clutch six months from now. There goes another $150.


I have refinished the generator, starter, oil filter adapter, oil pan and fan assembly. Now it's time to reassemble the basic parts of the engine. Do not forget the torque settings chart in your manual and your torque wrench.


The oil pan was installed first, fitted with a new gasket and new drain plug. Installing the clutch, pressure plate and through-out bearing is fairly straight forward. The clutch disc must be aligned using a pilot shaft configured to match the front shaft of the transmission. Then tighten the pressure plate mounting bolts one turn at a time, and check your manual for the proper torque wrench setting. Now the transmission should easily slide into place.


Next, I reinstalled the generator, starter, fan assembly, distributor, new motor mounts, oil filter adaptor with new rubber seals and exhaust manifold with a new gasket. The intake manifold and carburetor will be installed after the engine and transmission are back in place.


Check out the almost "finished" product. It probably didn't look much better when it was new!


Next I will be cleaning and refinishing the engine compartment.


Talk with you soon!


TD


Saturday, January 16, 2010

THE COURTSHIP BEGINS...

My wife won. I sold the Sprite to a guy that will give it a great home...he is an English sports car lover like me. Now I have more space in my garage for the restoration of the MGB, and does it ever take up space. You need at least three times as much space than the car itself requires.


First, let me say, that I am restoring this car to drive. I personally do not care for a car that looks new underneath. "Frame off" restorations are fine if you want to show your car and spend your days looking at it, but how could you enjoy driving a car in that condition knowing all that time and effort spent on the undercarriage was being ruined by road grime every time you drove it. After a careful inspection, I determined the undercarriage of my "B" to be solid and free from rust and damage of any sort; so I chose to leave it as is.


There are several items you will need prior to the commencement of the work. A digital camera, a pad of paper and a pen, several dozen Ziploc sandwich bags, two dozen one quart Ziploc freezer bags, several clear plastic bins with lids, and a shop manual for your make and model. Take plenty of photos, you may need them when you begin reassembly. As you begin to remove parts, inspect them carefully and determine if they may require replacement or reconditioning; if so make note of it immediately. As you remove fasteners and other small items, place them in one of the freezer bags, label them immediately and place them in one of the bins. Lastly, refer to your manual often. I know it's a "guy thing" to read the directions when all else fails, but it will only save you time to read about it first.


I began by removing all the trim and glass from the car. Next, I removed all the gauges and dash. The '67 B has a metal dash with a wrinkle finish. It appeared that a previous owner had tried to repaint it with a toilet brush...pretty disgusting.


The final stage of dismantling the car is the removal of the engine and transmission. You may wonder if all this is really necessary. In my opinion, what is the point of repainting the body of your car if it looks nasty under the bonnet. My car was a greasy mess under there. The motor had been leaking around the valve cover for probably thirty-five years and had never been cleaned or repaired. But do not let the oil leaks concern you. We British car lovers have a saying, "If the car was made in the UK, it leaks".


The removal of the engine and transmission is not that complicated. I have a good friend, Captain Bob, that loaned me his hydraulic lift and his help. He and I had the engine disconnected and out of the car in four hours.


Now my car is in little pieces. All the pieces are bagged, labeled and stored in a dry place. The engine and transmission have been separated and mounted on separate stands to aid in the cleaning and refinishing process. A detailed list of items to be replaced has been made and the shopping has begun. There are several English car parts dealers that have virtually everything you need for your restoration; Moss Motors, Ltd, Victoria British, Ltd, and Atlanta Imported Auto Parts. All these companies have web sites and they are more than willing to help you spend your money.


I am posting a photo of the my car before it became intimate with Captain Bob and me, and a few more of the engine before it was removed.


Well, that's all for now. More to follow...


TD


Thursday, October 8, 2009

ME AND MY OLD FLAME

I have been a English sports car lover since my dad bought a 1962 MG Midget for me when I was 17. What a wonderful car. I think I pushed it further than I drove it. But that little car, as abused as it was by its previous owner, kindled a fiery passion deep inside me that after 45 years has only grown more intense. Maybe it's the smell of the leather seats , the wind blowing through my hair (currently not a problem), the normal squeaks and rattles or even the constant aggravation provided by Lucas, Smiths and SU. Whatever it is...I am addicted to it!

My love for English sports cars has forced me to purchase numerous MGs, Austin Healeys, Jaguars, and even a Bentley. Oddly enough, my enthusiasm has not always been shared by my spouse. But I think she loves me more that she hates cars.

Recently, I purchased an 1969 Austin Healey Sprite that needs absolutely nothing. I'm just enjoying the ride! Not a week later I bought a 1967 MGB that needs to be restored...and the fire burns on. My wife seems to think I need to sell one of them but I think she's just a bit annoyed by the loss of her space in the garage.

Over the next several months, I will be restoring my MGB and posting step-by-step photos and descriptions of the work as it progresses. I hope you will check it out and let me know what you think. Suggestions are appreciated.