Wednesday, November 30, 2011

THE "NOSE JOB"

I wanted to make some subtle changes to the front end...


We removed the relief in the fender for the signal lights and welded in new metal. We didn't use panel bond on this patch because both sides of the patch could be cleaned and painted. Welded areas tend to rust much faster.


I bought a Sebring air dam to replace the bumper and front valence. It will be moulded into the fenders resembling a one piece front end.


Using the grille frame and moulding it into the fenders and air dam will complete the new look.


Stay tuned,


TD

Monday, November 28, 2011

REWORKING THE DOORS

This car is going to be different. No top, no side windows, no outside door handles or locks and, as we discussed previously, no body side moldings or body lines.


The relief in the door panel for the lock and door handle were cut out and new metal was installed with panel bond. Panel bond is a high tech adhesive suitable for these applications.


Since I have decided to eleminate the side windows, it was necessary to cover the window opening in the top of the door. This metal cover will also serve as the top trim for the upholstered door panel.


Before the application of any body filler, the allignment of the door should be checked and fixed in proper position.


Choose a good quality body filler. This product has changed drastically since the early days of 'bondo'. The good stuff costs considerably more but it bonds to the metal better and resists cracking. I will come up with a brand name for you if you need it.


Later,


TD


Saturday, November 26, 2011

CLEANING AND PAINTING UNDERNEATH THE CAR

This is a time consuming process, but one that will add value to your restoration. In this case it was necessary to refinish underneath because we had replaced all the floor pans. You know... one thing leads to another.


After the front and rear suspensions are removed, these cars weigh only a few hundred pounds and can be lifted easily by an engine hoist.


With the body shell tilted on its side the underneath can be cleaned and prepared for paint more easily. The joints between the frame rails and the new floor pans were finished with seam sealer.


This car had been undercoated years ago so I chose to apply more undercoating rather than cleaning and preparing for paint.


The entire process should take only about 24 man hours.


Now the body work begins...

TD


Thursday, November 24, 2011

INSTALLATION OF WHEEL BEARINGS, ROTORS AND CALIPERS

To begin, all parts must be clean. I strongly suggest using new wheel bearings but if you are considering reusing the old ones, inspect both the bearings and the races that are pressed into the hub for wear. Let the wheel bearings soak in mineral spirits for thirty minutes and blow out with compressed air. Repeat this process with clean mineral spirits until no more debris is found. Now you may pack the bearings with a good quality bearing grease by placing an amount of grease the size of a golf ball in the palm of your hand and press the edge of the bearing into the grease and forcing it out the other side. Grease all bearing races and inside the hub.

Now, fasten the dust covers to the swivel axle. Attach the rotor to the hub and torque the bolts as specified. Attach the hub and rotor assembly to spindle and secure with the nut and cotter pin. Tap the grease cap into place to complete the hub assemble installation.

The caliper can now be attached to the swivel axle assembly and torqued as specified.

The coil springs may be installed safely after the front suspension is mounted to the frame. This will be done after the car is painted and buffed.


Tuesday, November 22, 2011

RE-ASSEMBLY OF THE FRONT SUSPENSION

To begin, be sure to consult your manual for the proper fastener torque settings. Next, turn the suspension frame upside down and attach the lower fulcrum pins to the bottom of the suspension frame. Install the new polyurethane bushings and A-arms on the ends of the fulcrum pins and fix castle nuts with cotter pins as required. Locate the coil spring pan between the A-arms but do not tighten. Remember to use new lock washers and nyloc nuts. Now, install the sway-bar link in the larger hole in the front of the A-arm assembly.


Now, following the installation of the new lower kingpin bushings and seals, attach the swivel axle assemblies to the A-arms and torque all the fasteners. Next, install the steering arms to the swivel axle assemblies (note: steering arms are different; radius between mounting bolt holes should point upward). Torque bolts properly. Turn the suspension frame right-side-up and attach the shock absorbers to the mounting plates and torque properly. The coil springs cannot be attached until the front suspension is installed on the car, so install the new polyurethane bushings in the top of the kingpin and slide the shock absorber/kingpin bolt in place. Do not tighten this bolt, it will need to be removed when the coil springs are installed.


Next post will address the installation of the wheel bearings, brake rotors and calipers.


Later,


TD


Sunday, November 20, 2011

SANDBLASTING AND PAINTING THE SUSPENSION PARTS


I decided, since there were so many parts on this car that would require refinishing, to purchase a sandblasting cabinet. I chose a cabinet about 36 x 24 x 24 complete with a light and a dust recovery system. Refinishing the parts just got easier. After sandblasting all the small parts, spray them with self-etching primer to protect them from rust.


Next, clean or sandblast the suspension frame as required. The frame is considerably larger than my sandblasting cabinet so I cleaned mine using a pneumatic die grinder and a fiber paint remover wheel. It only took about an hour. After the paint, grease and rust were removed, self-etching primer was applied.


After the primer has dried properly, the parts should be lightly sanded and primed with an epoxy primer. Allow this primer to dry overnight and lightly sand again. Clean all the parts to remove dust and grease and apply two coats of single stage, semi-gloss polyurethane paint and allow to dry for at least 24 hours before reassembling the suspension


In my next post, I will discuss the re-assembly of the suspension.

Friday, November 18, 2011

RESTORING THE FRONT SUSPENSION

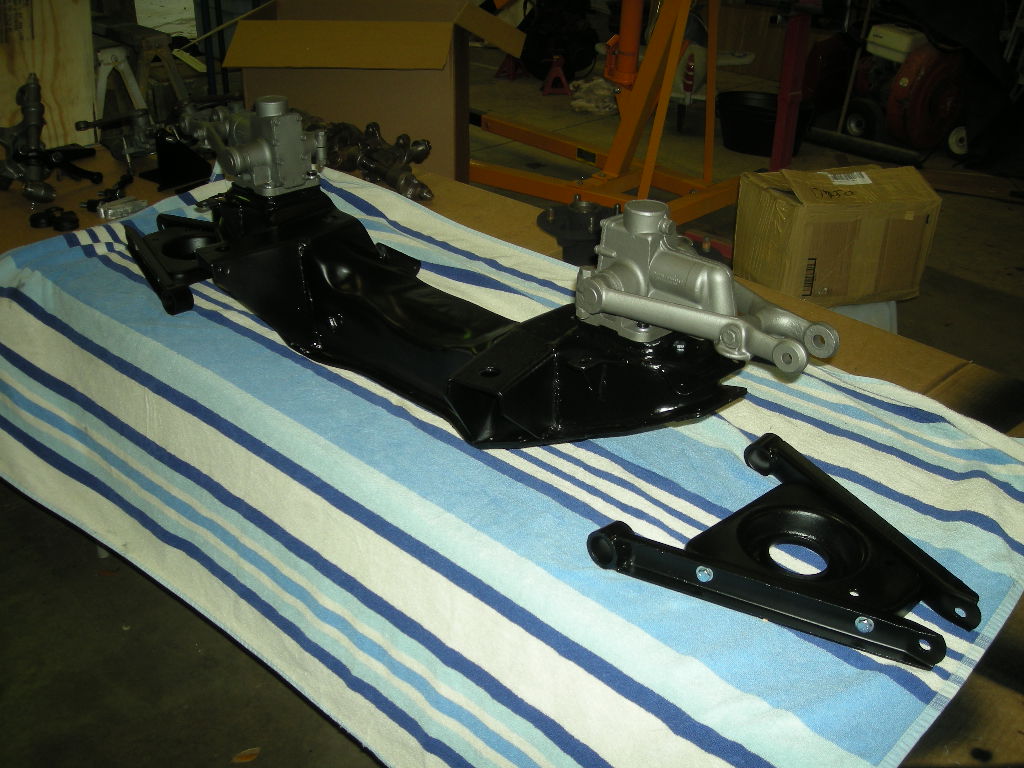
While Paxton was welding the new floor pans in place, I was busy restoring the front suspension. Fortunately, I had another old suspension in stock so that I didn't need to remove the one on the car.


I began by dismantling the suspension. It is amazing what years of neglect will do to an automobile. Some of the parts were fused together with rust and required a tremendous amount of work just to seperate the pieces.


When all the pieces are seperated, the restoration process began. I determined that the shock absorbers and the swivel axle assemblies will require rebuilding.


The shock absorbers had been leaking fluid for some time and the swivel axle assemblies were frozen so I chose to send them to Apple Hydraulics for proper restoration. They can be reached at 800-882-7753...ask for Lazar. Their prices are very reasonable and you can have remanufactured parts in your hands within three business days if your schedule requires.


Now it is time to make a list of the parts required to reassemble the suspension. All the bushings, bolts, nuts and lock washers should be replaced without question. I order my parts from Moss Motors at 800-667-7872 and I always ask for Jason Laffey at extension 3126. He is extremely knowledgeable and helpful. The assembly bolts required can be bought from your local hardware store and are much less expensive than buying them through Moss. I used fine thread, grade 5 bolts, lock washers and nyloc nuts just to be on the safe side. I was able to reuse the brake caliper mounting bolts, the steering arm bolts and the shock absorber bolts, but I did use new lock washers. Do not trust the old ones.


My next post will be concerned with sandblasting and painting the suspension parts.


Later,


TD